Description

Part #RCS097-841
VALVE STEM KIT (FOR RPI REPLACEMENT FILL/VENT VALVES)
This valve stem fits only the Fill Vent Valves with (2) of the same sized o-rings (RPI Valve Assembly)
Fits: Fill-Vent Valve Manufactured by RPI
Model(s) This Part Fits: Midmark M7 Autoclaves
Notes: Fits Only RPI Fill-Vent Valve!
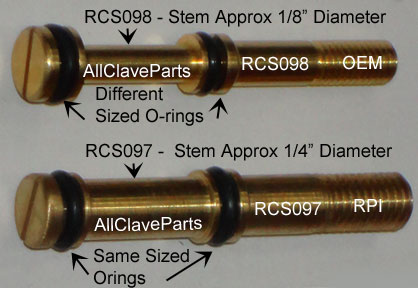
Some fill/vent valves on the Midmark M7 Autoclaves were replaced with the RPI valve. To make sure You are ordering the correct repair kit, you need to determine which valve you have. Simply follow the directions below to remove the valve stem and look at the size of the 2 o-rings as shown in the picture to the right
If the o-rings are the same size, then this is the kit you need. If one is smaller than the other, then you need to order the RCS098-842
You can also measure the diameter of the stem, just below the screw head. If it measures ~1/4 inch, then this is the kit you need. But, if it measures ~1/8 inch, then you need to order the RCS098-842
SERVICE TIP: AllClaveParts offers a less expensive alternative to replacement of the Fill-Vent Valve with this kit. Now you simply replace the valve shaft and o-rings, instead of replacing the entire valve
How To Replace The Midmark M7 Autoclave Fill / Vent Valve Assembly
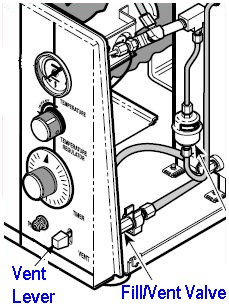
The Fill / Vent Valve Is Located Behind The Fill / Vent Lever
How To Remove The Valve Assembly
- Remove cover assembly Click Here for Instriuctions
- WARNING: Make sure unit is vented and cool before attempting to make repairs. Failure to do so could result in serious injury or burns.
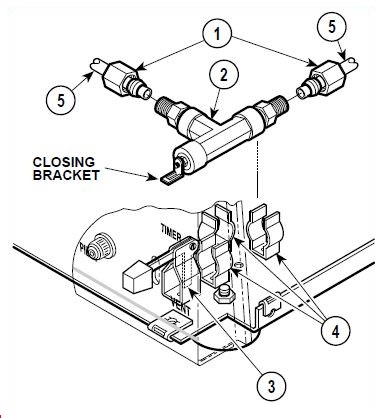
- Loosen and disconnect the two compression nuts (1, Figure 4-18) from fittings of fill / vent valve assembly (2)
- Disengage closing bracket of fill / vent valve assembly (2) from fill / vent lever (3) by lifting up on back end of fill / vent valve assembly first and then pulling it out of brackets (4)
How To Disassemble The Fill Vent Valve
- Remove fitting (1, Figure 4-19) from valve body (2)
- While holding nut (3) stationary, unscrew closing bracket (4) from plunger (5)
- Remove nut (3) and spring (6) from plunger (5)
- Push plunger (5) out of valve body (2)
- Remove two o-rings (7 and 8) from plunger (5)
- Note The Sizes Of The O-rings - if they are the same size, the repair kit you need then this is the repair kit you need (RCS097-841)

How To Reassemble The Valve
NOTE: The back side of the plunger has a screwdriver slot / allen wrench to assist in adjusting the closing bracket and nut.
- Flush all foreign matter out of valve body (2)and off of all components with water
- Coat o-rings (7 and 8) with high temperature lubricant included with Repair Kit
- Install o-rings (7 and 8) on plunger (5)
- Insert plunger (5) into valve body (2)
- Install spring (6), nut (3), and closing bracket (4) on plunger (5)
- Adjust closing bracket (4) until Distance A is approximately 3/16 to 1/4 inch (0.47 to 0.63 cm). Secure closing bracket in position by tightening nut (3) against closing bracket
- Coat threads of fitting (1) with Teflon tape / sealant
- Install fitting (1) on valve body (2)
How To Install the Fill/Vant Valve Assembly
- Install fill / vent valve assembly (2) in brackets (4), making sure fill / vent lever (3) is inserted in slot of closing bracket
- Position tubes (5) and screw compression nuts (1) onto fittings of fill / vent valve assembly (2)
- Install cover assembly - See Instructions By Clicking Here
- Test operation of fill / vent valve. If water will not flow or flows very slowly when fill / vent lever is depressed, lengthen Distance A slightly. See Figure 4-19