Recalibrating The Statim 2000 Boiler
Step-By-Step
How To Recalibrate
The Statim 2000 Boiler
While "Recalibrating Your Statim" may conjure up images of a complicated procedure using sophisticated equipment & technique, it really
is simple!
Thanks to the ingenuity of the folks at Scican, it is a process most anyone can perform
There are only a couple of tools you will need to complete the procedure:
- You will need is a screwdriver to remove the cabinet screws on each side and in the rear so you can gain access to the PC Board.
- The other tool you will need is a "jumper."
The jumper is nothing more than a short piece of standard electrical wire with "aligator" clips on each end. You can get a
jumper most anywhere (like Radio Shack)or you can simply make your own.
The most challenging part of this procedure is working within the limitations imposed by the short cable length on the
cover. You just cannot go anywhere with the cover when you take it off.
The two cables connected to the cover must remain plugged in while you perform the operation
To simply this, we offer an
extension cable

(it gives you an additional 25" of cable & is what the pros use). This allows you to set the cover off to the side and perform all of the funtions needed.
It is a must have! We use it every time we work on a Statim
Let's get started.
- Turn OFF main power and remove the cover from Your Statim
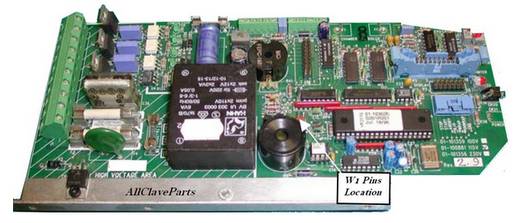
- Short together PINs W1 with a "jumper" on the main PCB board
- Turn ON the power
- The LCD should display CALIBRATION with: 2 digits in the upper left, 2 digits in the upper right.
Note: The lower left will show the temperature difference between boiler and chamber, while the lower right side shows
the chamber temperature
- Insert The Cassette
- HOLD down the UNWRAPPED and press START
- The 2 digits in the upper left change to 00> and a message CALIBRATING* shows up in the Display
- The process takes about 5 minutes, and when completed, a long beep will sound.
The upper left will change to 2 digits again
- Press STOP to allow the Statim to vent
- When The Display reads PRESS STOP TO RESET, Press the STOP Button
- The display will now read SELECT A CYCLE
- Turn OFF the power, and remove the JUMPER From The W1 PINs
- Re-install the cover
- Turn ON the power
Calibration Is Now Complete On Your Statim 2000!