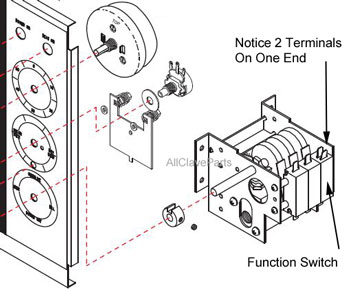
Description

Part #PCS043-124
Pelton Crane Part #004079
FUNCTION SWITCH (3 LEAD)
- 20A @ 125-250VAC, 50/60HZ, 1HP @ 125VAC; 2HP @ 250VAC
- Mounts to bracket on Main Valve Assembly
NOTE: The manufacturer of this switch has discontinued making them for Pelton Crane. While this part is made by the same manufacturer the configuration is different fom the original Function Swith.
These Switches will have to be turned upside down to install properly. This is not a problem, but you may have to cut a cable tie to get the existing wire to reach
Click Here To View Locations On Main Valve Assembly
How To Test The OCR Autoclave Function Switch
To test the Function Switch on The Pelton Crane OCR Autoclave, all you will need to complete this test is an ohm meter (for testing continuity), and a Flat Blade Screwdriver
Once you have these tools on hand, we can get started with the test:
Note: What you are looking for with this test, is a "change of state" (meaning from continuous to not continuous and visa versa)
Warning: Unplug the autoclave from the outlet before proceeding
- First Remove the Cabinet and set it aside
- Locate the Function Switch (the Function Switch is located on the side with the knobs. On the inside of the Front Panel, towards the bottom, you will see a row of 3 black (or brown) plastic switches. The function Switch is the one closest to the rear of the autoclave and is the only switch with three terminals)
- Set your ohm meter to the Continuity setting, this setting is usually indicated by an alarm symbol. If you do not have the alarm symbol, set your meter to 20K. Then test your setting by touching the end of the two probes together. If your meter is set correctly, you should see a zero ("0"). When you separate the probes, you should get a one ("1"). (Note: a "0" means it is continuous while a "1" means it is not continuous)
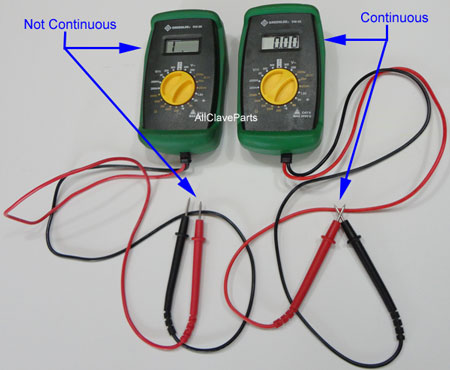
- Next, place one probe to the bottom terminal (this is the "common" terminal) of the Function Switch. Now Place the other probe to one of the two terminals on top of the switch and look at the reading on your meter (it should be either a "1" or a "0"). Next, while watching the meter, use the screwdriver to push in on the bar on the other side of the function switch. The reading should change. If it was a "1" to start with, it should become a "0". If it was a "0" to start with, it should change to a "1"
- Continue by keeping a probe on the bottom terminal, and then going to the other terminal on top and perform the same test
Should the switch not change its state as indicated above, then the Function Switch is broken and needs to be replaced. If it changes states like it is supposed to, then the Function Switch is not your problem and you will need to continue troubleshooting


