Statim 2000 & 5000 Error Code
Cycle Fault 16
"What It Means And How To Fix It"
Cycle Fault 16 being displayed on your Statim indicates the steam generator (boiler) temperature went above 171°C during the heat up phase of a cycle
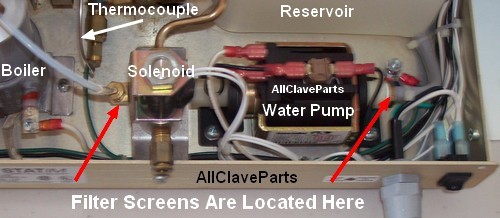
The most common reason for this fault is caused by not enough water entering the boiler from the water pump. To understand what is happening, know that there is not a water level sensor in the boiler.
The water pump is controlled by the pc board, and the pc board simply turns on the water pump and then shuts it off after a specific amount of time has passed (a timer)
Once that time is reached, the pc board simply shuts off the water pump and turns on the boiler heater
The board then monitors the temperature and pressure inside the boiler. Without the proper amount of water, the boiler heater overheats. If the board catches it in time, it will simply
abort the cycle and generate the error code: "Cycle Fault 16"
If it does not catch it in time, it will stress the boiler thermofuse, causing it to blow and will then generate error code "Cycle Fault 25"
The thermofuse will have to be replaced before a cycle can be started again
With the problem being centered around the water pump, one of two things is happening:
- The internal water filter(s)is clogged, or
- The water pump is defective and needs to be replaced
To clean the filters, you must first get access to them by remove the fittings they are housed in
WARNING: Unplug Your Statim 2000 Before Proceeding
Tools required:
- Wrenches (3/8, 7/16, 9/16 and 5/8)
- Pair Hemostats (To Clamp Water Line Tubing)>
- Phillips Screwdriver (To Remove Cabinet)
Recommended Tool: Statim 2000 Extension Test Cable
Parts Needed: None
Start by removing the Statim cover
- Remove the cassette and set it aside
- Using the Phillips Screwdriver, remove the 4 screws from the sides (2 on each side) by turning them in a counter-clockwise direction
- Again, using the Phillips Screwdriver, remove the screws from the rear of the cabinet
- Set the screws aside in a safe place
- Lift up on the rear of the housing and slide it forward gently. Once cleared, you can pick it up and set it on it's side (be careful, there are ribbon cables connected..this is where
the Statim 2000 Extension Test Cable comes in handy
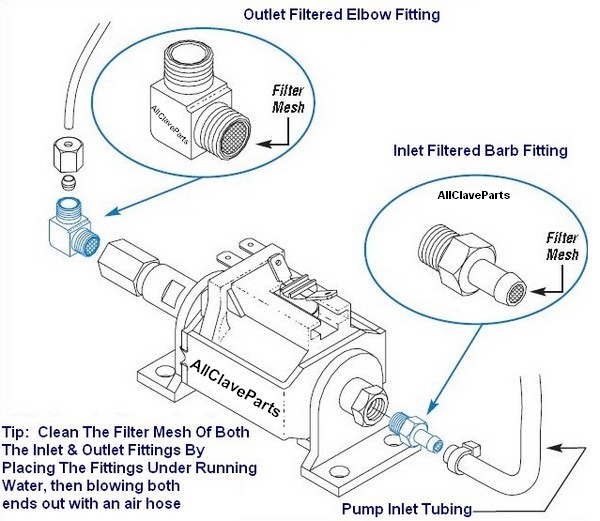
Start with the end of the pump with the larger (gray) tubing connecting to the reservoir.
- Use hemostats to clamp the line to stop the water from flowing, and then pull the water line tube off of the pump
- With a wrench, unscrew the nut on the water line going from the water pump to the boiler and remove it
- Fit the 5/8 open-end wrench onto the flats of the white plastic fitting (Do Not Attempt To Turn The White Plastic Fitting) and the 9/16 onto the brass nut. Turn the nut counter-clockwise
while holding the plastic nut in place. Be carful to keep the nut straight as you take it off (an put it back on) The plastic threads are easy to strip and if
that happens, you will need to replace the water pump
- The screen is located inside the fitting. Check to see if it is clogged (usually a gray lint like material). If it is clogged, Scican (Statim) recommends you punch the screen out and
remove it from the fitting. Then install the external water line filter we offer between the water reservoir and the water pump
Now go to the other side of the pump.
- Remove nut with the small diameter tubing running between the elbow located on the front of the water pump & the boiler using a 3/8" open end wrench by turning it counter-clockwise.
- Place a 5/8 open end wrench on the nut under the bracket that the elbow screws into. Now place the 7/16 wrench on the elbow and turn it in a counter-clockwise direction
- (Warning: Be Careful Not To Move, Disconnect, Hit Or Otherwise Damage The Silver Colored Tube. This Is The Thermocouple And Has Glass On The Inside)
- Tip: If the elbow will not turn, remove the larger wrench from the fitting and turn the elbow counter-clockwise. Once removed, then using the two wrenches, separate the elbow from the fitting
- Place the fittings into the ultrasonic cleaner and give it a chance to clean them thoroughly. Rinse well and blow out the excess water.
Once clean, reinstall the fittings and reconnect the tubing. Run a cycle with the top off and chck for leaks
If Cycle Fault 16 does not return to the display, you have fixed the problem! Re-install the cabinet and put it back to work!
Note: If you had sent this somewhere for repair, it would have cost you $1400 + shipping in both directions, and you would have had to wait a minimum of 30 days to get it back!
You just repaired it in a matter of minutes and it didn't cost you a penny!
Note: Scican now recommends that the water pump filters above be removed and replaced with the external In-Line Filter system, you can find it
by Clicking Herefor the Statim 2000 or
Clicking Here for the Statim 5000
Now would be a good time to order a few Statim 2000 Cassette Seals Or
Statim 5000 Cassette Seals
and the Statim 2000 Extension Test Cable or the
Statim 5000 Test Cable for the next time service is needed.


